Finished automata

Despite a few flaws, mostly as a result of figuring movements out as I went, this latest piece works well. The biggest problem was the coffin and rising corpse, the coffin doesn't open quite far enough, and to fix this I would have had to rebuild the entire piece. Also the handle is at the back which means the operator can't really see the working automata, again this would have needed a complete rebuild. That said I learnt a lot making this piece and know that I could fix these problems.

Below are some detail shots.
 The witches head, amde from sculpey, with 2 different beads for eyes, o give her an old rheumy look.


The witches hair is made from something I picked up from the scrapstore, glued to the head. It is hard to control so gives a suitably thin and whispy look.
The head and arms are operated by brass levers and thread. One arm only has a thread as at it moves it pulls on the other arm, unintentional but it works.


The graves are cut from thick marine ply and sponged with greyish acrylic, then the cracks are  exaggerated with black paint. Once attached they will be covere with bits of green modelling moss.
 The ghost is a simple head sculpted from Das on a brass rod with a cross piece for the shoulders. The one arm slots through this and is attached by a thread to the base, so as the ghost moves the tension on the tread makes the arm rise.
The figure is covered with thin white gauze to gve a ghostly finish.
 The corpse is built on a basic ply shape, hinged at the hips so it can sit up. the arm and the head are joined to the base with thread so as the corpse sits up they are pulled into position.
The figure is stained with yellow/brown acrylic to give and old look, the skull modelled in das has a bead eye and whisps of hair.
The coffin itself is wood line with red material.


you can see a more finished video clip of the automata on youtube.

http://www.youtube.com/watch?v=m1w11UmCVEw

Raising the dead automata


I've nearly finished this latest automata after a week long session in my studio over the holiday period. My aim was to experiment with gears that would allow different figures to move at faster or slower speeds by using a ratchet (see alst blog) This was actually fairly easy, but it took me a while to get the rest of the movements correct: a coffin lid slowly opening, a corpse sitting up and then falling back down, the witch swaying from side to side and a ghost appearing in the background.


The coffin was the hardest part and then putting all the bits together so they sycnchronised. I tried various versions and took the whole thing apart many times but finally have something that works. There will be a video of the movement later, but for now I'm putting the finshing touches to the figures and background.


Making the coffin work
Below you can see the cam which opens the coffin lid, it took ages to get this right. The cam, operated from the ratchet, slowly turns and pushes the bar down, this in turn pulls a lever which lifts the coffin lid. I've added a curve to the wooden part of the bar because as the cam turns, getting bigger and so applying pressure further from the bars it's axis it started to drop again


Here you can see the mechanism through the coffin, the mechanism above pulls the lever which opens the lid, the weight of which closes it again.


The mechanism from the other side. On the right you can see another cam which will operate the corpse. basically as the cam turns it pushes the wooden bar down, when it gets to the end of the curve the bar drops back into place, allowing the corpse to fall back into the coffin.


 The Witches mechanism
I've split the mechanism into two halves, on the other side of the ratchet mechanism is a cog and crank operating the witch. As the crank turns it moves the witches arms up and down by pulling on the cords.
On the right you can just see another cam which will make the witch sway from side to side. These mechanisms are turned by the handle at the back and like previous sculptures move at the speed the handle is turned.
On the left is another cam, this time operating from the second, slower movement allowing a ghost to sway slowly from side to side.


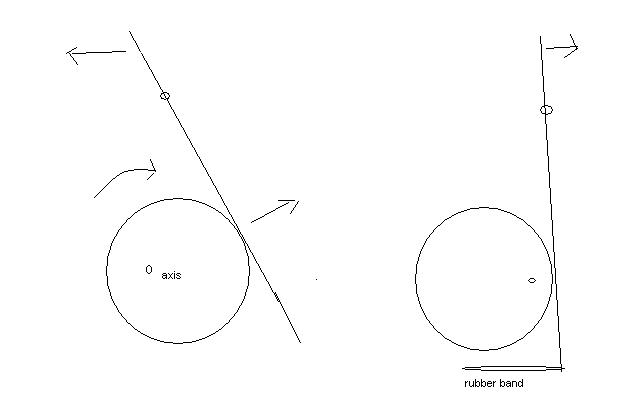
I've used a number of cams in this automata as they are a simple way of moving something, the diagram below, I hope, explains the basic principle.

The corpse
Now that the mechanism is sorted I can focus on the actual characters, although there will be a few more movements to add as I go. I'll add more detailed shots later, but for now here is the corpse the witch will be rasing from his coffin.


wakey wakey

I'm continuing experimenting wth automata and am now attempting something a bit more complex. I want to create a piece that has a sequence of events rather than just continual repeating actions. The plan is for a witch, standing over a grave, waving her arms while a coffin lid slowly opens and up rises a figure.
Someone suggested using a ratchet, so I decided to experiment.
You can see the results so far, and although it's a bit rough it seems to do what I intended

Some of the movements need re working, and the cams which opperate the coffin lid and zombie need changing in size so the lid stays open longer but so far so good.
I made the spiral shaped cam by drawing 2 circles, adding lines every 20 degrees and then marking a point x cm from the centre, each subsequent point slightly further away and then joining them. Not mathematically perfect but works.


Witches

I've been really enjoying getting automata made for the open house on Sunday

Here's the latest video. My plan is to experiment a bit more with lighting and editing, even so the result is fun, if a bit crude.


Witches Abroad

It's been a few weeks since my last post due to a dead pc so lots to share. Had a lovely visit last week from a bunch of UWE anmation students who wanted to see my work as there tutor had shown my work as example of good model making. Lots of interesting questions on materials and techniques so I hope I was of help to them. Needless to say was very chuffed by all the attention and I look forward to seeing some of their work very soon.
Also I will be showing my work as part of an automata open house on Sunday Nov 20th at the home of Wanda Sowrey a talented automata creator along with other automata artists  as part of the Bishopston arts trail. More on this later in the month, but if you lve in Bristol it will be well worth popping in.
In preparation for this I've been working on some new automata.
The Witch, below, is a mini version of The Hag and unless I sell it will be an xmas present for a good friend. If it sells I'll have to make another!


I've been having a lot of fun with these pieces and feel I'm getting to grips with some workable techniques so I'm now going for something more ambitious, 3 witches!


I was givvn some good advice about trying to work everything of one central rod and I originally intended to have all the cranks, which pull the cables and make the witches move on a long horizontal one. However I realised that the pull on the cable wasn't right and it worked much better off a vertical central rod (which works the cauldron) I think this is because the cables are always moving in the horizontal plane rather than vertical.
So most of the actions come off 3 cranks. Different lengthed levers for arms etc allow for different movements. The tricky bit was getting the witches to move without catching each other.The central witch is basically a remake of the previous one, as is the one on the left.
I wanted a different movement for number 3 so she rocks from side to side. At presnet she is just a stick but I plan for her arms to go up and down too.
I also reckon moving trees at the back will look cool (I have an idea but can't explain it)


The basic mechanism ro work the cauldorn, thick ply and carefully measured brass pins give a smooth movement. The vertical bits are vital to keep the rods centered and stop the cogs becoming unaligned.


I've added 3 cranks here, snugly held in place by horizontal pieces. I was woried that the cranks would not be strong enough and that the pull of the rods moving the witches would distort them but they seem fine. I used wooden rods slightly thicker in diameter than the holes so a ver snug fit and thin brass pegs hold them all in place.


Below you can see the first 2 witches hooked up to the cranks, heads, bodies and arms all have different cranks so combine to give interesting movement.

The Hag

I had great fun making this piece and although it's mechanism is quite simple I learnt a lot about automata creating her. I'm going to try a simple mini version next to give as a present.
In this first video you can see all the mechanisms. I've started to play with some sound effects.
Below are some close up shots of the deatils.


Having added some sound effects to the basic video I wanted to play with lighting effects, so waited till it was dark and filmed her with a spotlight and smoke effects.

The Hag week 3

The hag is pretty much done now. I've added some bits, notably the tree and the bat as well as replacing the planned cat with a talking skull.


All that's left is the cauldron which needs remaking and a bit of detail and colour in places.


The Hag week 2

A busy weekend refining and making the mechanism for The Hag. I've always had problems getting accurate gearing so opted for brass rods for teeth set in thick ply. The thick ply allows for deep holes to be drilled with a pillar drill giving accurate  and firm setting for the rods. You can see from the video how the mechanism turns the wheel in the cauldron to make her stir the pot. The other arm and head are operated from an offset cam via cord. I've added a lever as well which will make a cat lick her paw (hopefully). This is just a crude card shape at present to give an idea.


The next stage is to finish the sculpting and cloathing of the hag and find/make a better cauldron.
I think I will add lots of bits to the mechanism box and base to suggest cobwebs, roots etc.

The Hag

I've been meaning to make a witch figure for some time and suddenly had a burst of inspiration so made a pair of heavy Granny Weatherwax boots out of sculpey. I often start with feet when trying to capture a character, I don't know why but it works. Having a starting point I decided that it would be fun to make her as an automata. Initially I wanted her to be stirring a big cauldron because this a nice simple motion to make but as she has developed she has aquired other movements.

So far I've roughed up a basic shape and simple movement (not yet operated by one mechanism so in the video I'm moving the bits by hand)

The stirring mechanism is a simple rotating wheel and the hands are moved by the brass rod (which will become the spoon), arm joints are just string which seems to give a nice loose movement.
I may end up with her stirring one hand and have the other waving over the cauldron if I can figure out a mechanism.
The head just nods up and down and this will eventually be linked to the same mechanism as the cauldron.

Here are a few close ups

The basic sculpey head with blind eyes, this needs to be baked and be bulked out top and back.

 With a shawl.


The basic armature worked out, you can see the wheel and brass rod that will become the cauldron and spoon as well as the wire at the back of the body to move the head.

The armature with some bits of fabric to give  feel of how she will ook when clothed: lots of tatty wrags and shawls I think.

Bits and pieces and a load of junk

Firstly the finished girocopter, which has been done for some time with photos on facebook but not on the blog.
This summer has found me in the creative doldrums. I've made stuff but nothing has really sparked for me and pieces have been slow to come to fruition. Normally when I lack inspiration I make a head or fiddle with something and ideas quickly flow. Here are two of these:

Firstly a weird mechanical device for the back of an old man. I've no idea what it does or will become but you can see how it started.
I've been trying to make my mechanical stuff have a more interesting surface texture and look more authentically mechanical. I do this by using lots of found junk and joining the bits with various thickness of brass rod, which doubles as pipes. I often just gather bits together and try mixing them up.


The only made bit here is the barrel which is card wrapped around two plastic circles. Drilled wooden balls are great for fixing things to. The brass rod here was bent to give an interesting pipe effect and brass beads added. As always vials of fairy liquid give colour.
I have no idea what this is supposed to be, the tube here into the mans hand is just a  trial, he may have other bits added.
I want him to look loaded down like some kind of tinker or hudy gurdy man.


I've also been working on a dwarf like figure, a bit of a rehash of earlier ideas, again not sure of the end product, possibly a kind of mechanic or prospector.


I like the idea of a big bushy beard under a helmet or cap and  a short squat body. I'm using two newish techniques here, firstly filling the goggles with modellers water which sets clear and making the hands from plastic tube over a wire armature with split pins slotted in the ends. They look smoother, chunkier and cleaner than just wrapping the wire in tape, which I do for smaller hands.

The head needs a lot of work yet as I've just set the bottles in a polystyrene ball onto which I will sculpt in clay, but you get an idea of body proportion.