more mechanical figures

One of the things I enjoyed creating with my last couple of figures was the mechanical bits coming out of their backs and the robotic arm. I have a few ideas for developing this, one is a bulky cyborg type figure, possibly a mechanical Mr Hyde, another is a development of the wheel chair bound figures, but this time with a smaller seat actually built into a giant robot, possibly with a wizened old man driving it.
However with school holidays nearly over and the restrictions work place on actually making anything complex I came up with a simpler figure of a bent old man with mechanical bits coming out of his back. This figure was originally inspired the electric cables coming out of the back of a piece by Stephane Halleux, I liked the body shape too. (kind of reminds me of Belleville Rendez-Vous)

Over the next few posts I thought it would be helpful to explain how I make a sculpture.

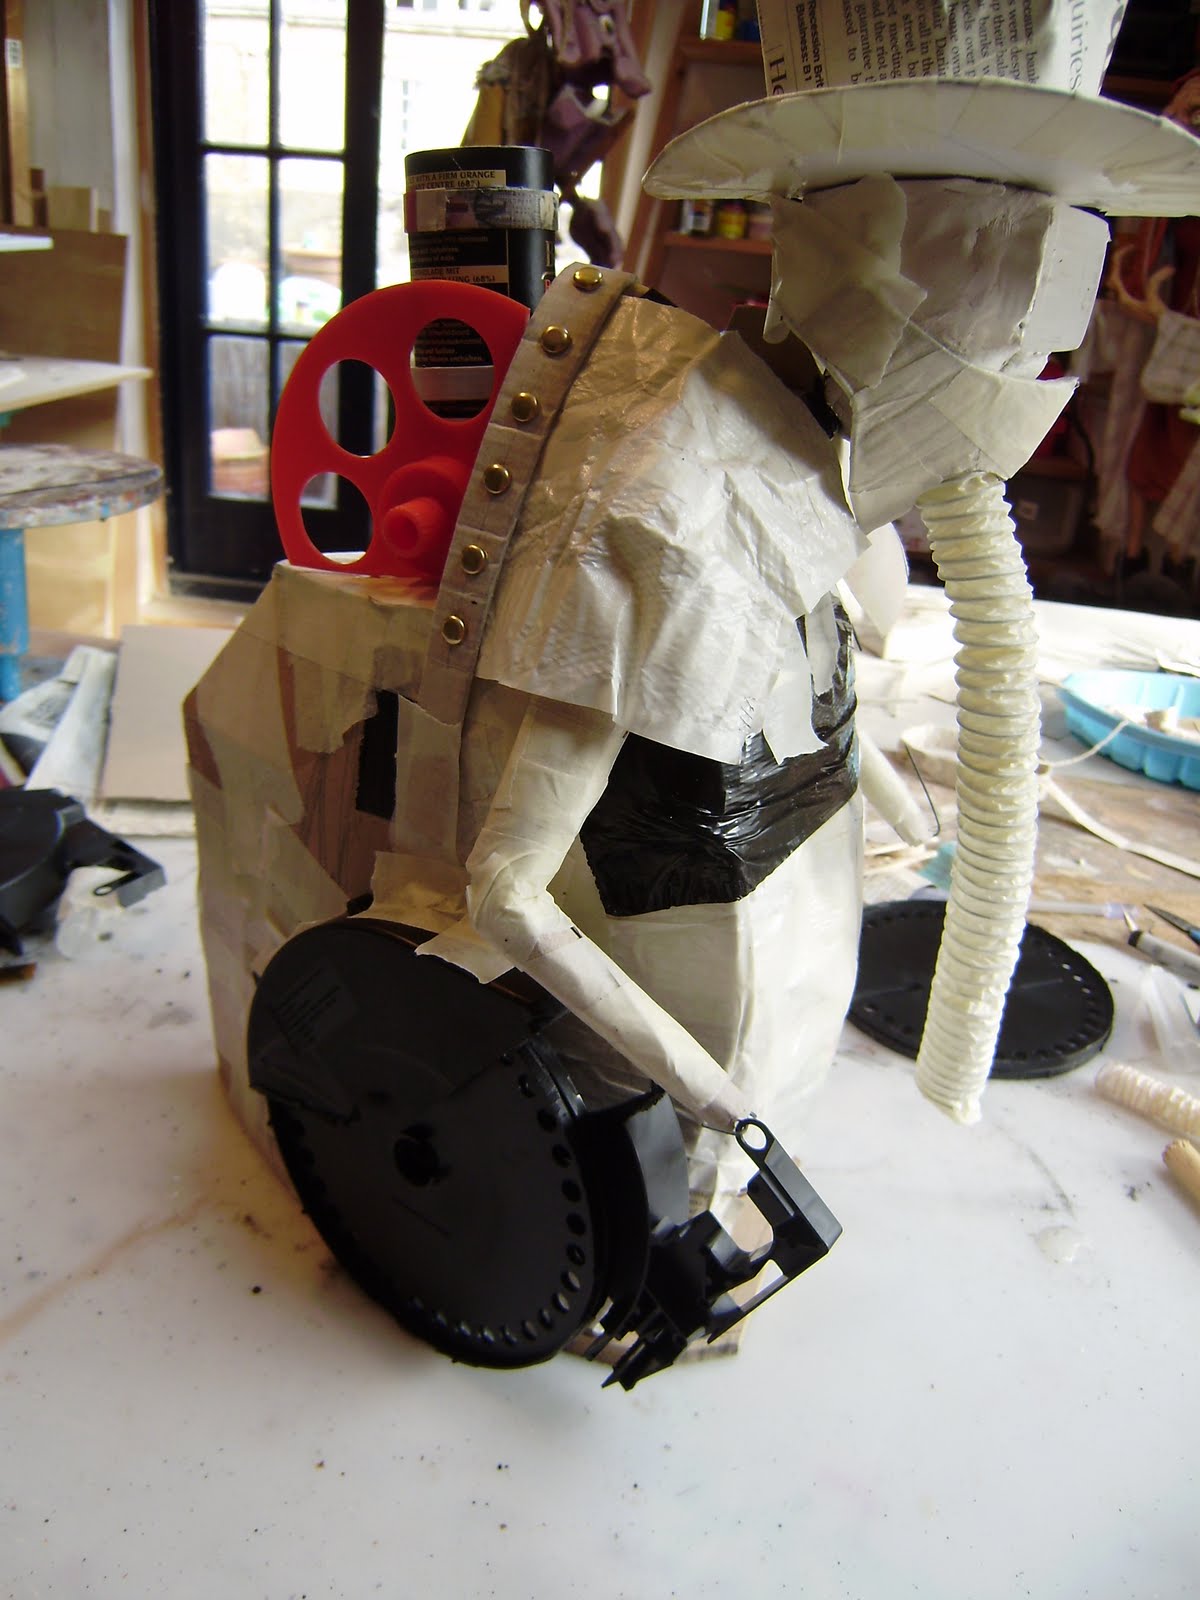
Here you can see the basic body taking shape. It is just a basic cardboard shell roughly taped with masking tape. I use quite thin corrugated card which is very flexible. The corrugations allow it to bend nicely in one direction, in this case they go upwards so the shape curves towards the rear. I sometimes score the card if I want it to flex in more than one way.
It takes a bit of playing to get the shape exactly as I want it but once I'm happy I reinforce with gaffa tape. The top of the shape which will become the hole in his back is reinforced with florist wire.
Here you can see two plastic shapes for goggles bound onto a piece of wire for the neck with a bit of newspaper to pad out the chin. I've used two bits of flexible palstic tube for arms with stiff wire inside so they can be bent into shape. I normally use rolls of card but I found this and thought it would look good for him to have thin arms.


Because the figure leans forward he kept falling over so I slit open the back and packed it with a lump of clay moulded to fit.


I've skipped a bit here to show the figure nearer its final incarnation with bits of plastic and cogs just poking out of his back. I had originally planned for him to be pushing some kind of cart with cables coming out but I like these slightly claw like walking sticks. They are just slotted into the arms so may change.


Complete automata


almost complete automata


I've now started to sculpt and add detail to the figure. All the actions work but it is clear that although I've learnt a lot about making mechanisms the final piece just doesn't have enough movement to make it interesting. At the very least the cogs in his back should move. Also I'm not happy with the the head movement.
Another day or so should see him complete. He will look nice static anyway!
I also now have more inspiration for another (static) old man figure with a mechanical back.


steam punk wheel chair automata mechanism

After a week of battling with various types of mechanism I've finally got it all working and I'm feeling rather good about the end product.
The big challenge was making a movement for the back of the wheelchair, and it was clear that I'd have to use cogs. So far I've had little success with these but as they are an essential part of most automata I realised I'd have to figure out how to make them.

Using wheels with pins seemed the best way as I knew I could make these fairly precise.
As you can see I made a simple jig (just the toothless cog set into a block of wood on its axle) to ensure each pin hole was the correct distance from the centre.


The cog on the main axle turns the cog at right angles to it for the back mechanism. I spent about 8 hours getting this to actually work. It kept jamming, after various changes I realised the gears were not close enough: you can see a bit of wood slotted behind the cog to push it gently against the other one. Success!!!!!

This allowed me to add another movement in the wheel chairs back, it doesn't have a function other than to look nice. I did want a flywheel in the back but it was too complex and would have involved major changes to the chassis, which already needed a hole added for the up and down piston. I will eventually add something to the other end.
Once the movements were sorted some cosmetic work was needed on the figures arm and the back area.

The back had a selection of fake cogs and bits added, inspired by some clock insides, I would have loved to make this all move, maybe next time.

I had a basic arm movement and was happy that it worked well but it looked wrong. I could have gone for a very stylised figure and made use of the joints as part of the look but it didn't feel it would go with the rest of the figure. I hit upon the idea of a robot arm, after all he is built into a steam powered wheel chair!

The arm still need a bit of work cosmetically but it works fine.
Now I have all the movement sorted I can work on sculpting the figure. It will be inspired by the last figure, my steampunk technomancer but not a copy. The challenge will be to allow some bits to be removable in case I need access to the movement inside. I also want to try using real leather but we shall see.
I've learnt a lot from making this, not least the importance of careful planning, and perseverance has payed off as you can see from the video which shows some of the main movements.


automata mistakes

I am now in new territory so have spent a lot of time building and rebuilding mechanisms. I have been trying to discover the best way of getting everything to work off the main axle and lack of knowledge means trial and error (helped by a great little book 'Cabaret Mechanical Movement' from Paul Spooner's web site). I haven't helped myself by not having a clear idea of what I want to do. I have used a bell crank (which in this case turns a vertical movement into an horizontal one, with the intention of making the figures head turn from side to side.


One thing I've learnt is that trying an idea out in card using split pins for joints really helps visualise the end product. I've then moved onto making a simple version using florist wire (you can see this in the head mechansism). As you can see this is a bit of a rough version but it does work. I can now rework it to improve strength and smoothness of movement.

One thing I am pleased with is the change in speed from the wheel spinning in the background to the gentle left to right head movement. That was a total flook!

Saw a great quote from the director of Toy Story 3 who was discussing the experimental approaches they use to create Pixar movies: "Screw-ups are an essential part of making something good. That's why our goal is to screw up as fast as possible"

New Automata

As it's been positively autumnal today I've spent the entire day on the new automata. The aim is to learn some new skills and work out how to use more types of mechanism. The automata will be loosely based on my last sculpture of a steampunk wheelchair but will no doubt change as I try at new ways of making the thing work,

Today I've built a basic frame and a mechanism to make the wheels turn. I was admiring the work of Keith Newstead who often makes all the movements originate from the wheels which are on rollers (check this video out). This seemed like a good idea and a fun challenge. My main problem was creating a smooth action where the wheels meet the rollers, if this isn't ok then the whole thing fails. I tried various wooden wheels but it quickly became clear that my cutting skills were not accurate enough; cutting a perfect circle is really hard, ask Giotto and he only had to draw one!
So I opted for using plastic bits I had in my junk box. I think they actually look better than the wooden ones anyway, you can see both versions in the photo. The rollers are covered in a piece of soft textured foam for traction.

Once this was worked out I cut a basic frame and base onto which everything else can go. The next problem is how to make the wheel movement operate the engine. I had planned to use an elastic drive from the wheel shaft to the next mechanism, but this just doesn't seem to have enough traction. So it will need a cog or crank on the wheel shaft. That is a problem for another day.

Steam Punk Technomancer


steam punk wheel chair necromancer

Nearly finished now. At stage of adding details and painting as you can see form these shots. I am not sure about the face itself though; I've abandoned the idea of a breathing tube and at the moment it looks skull like which is unintentional it was just the shape I sculpted to attach the mask to but it has potential. Also I've added a new eye piece based on something I saw on deviantart which I think looks kind of scientific.


steam punk wheel chair

This figure is quickly taking shape, but has changed dramatically from the original sketch in that he is now in a wheel chair. I always wanted the mechanical bits in his back so this is a fairly logical evolution. This has meant some rethinking of the figure's coat, which was originally intended to be a long leather one. I am thinking more along the lines of a lots of straps and rivets, a mix of Edward Scissorhands and the work of Stephane Halleux. (If you dont know this sculptors amazing assemblages check the link out)
I am still determined to recreate this figure as an automata, I've figured out the basics but I want to add some thing a bit weird, maybe something slowly coming out of a door in his back. Not sure how yet but it will be a fun challenge!


Another Automata?

I've had some good feedback on deviantart for the spider and I'm keen to use what I've learnt to do something more ambitious. Ideas so far include a steam punk fish with moving fins and mouth or a winged figure or possibly a figure in some kind of flying machine. While thinking how to move forward I've gone back to a figure I started last month. Although I had some ideas for this I was a bit unhappy with the way it was developing, so I got out the junk box (courtesy of the scrapstore) and started to play. The result is the figure is now part mechanoid with a chimney and fly wheel in his back and wheels! He is turning into a steam punk Davros so maybe some Dalek type panels rather than a leather coat?


As the figure developed today I realised he would make an excelent automata. I will complete the static figure and then recreate as a moving figure. the wheels and flywheel could move but not sure what else, maybe a turning head and moving arm?


Anyway here are some photos of the bits from today.


Steam Punk Spider automata

Well after nearly 2 weeks it is complete and working!
It would have been done earlier but I decided to add some extra movement. The mandibles move (not much though) and I've put a little motor into the body to turn a big wheel. it doesn't actually do anything but I like it!
Let me know what you think.

I feel really pleased with the end result, especially as it was my first go. Some of the movements are a bit sluggish (not helped in the video by me turning the sculpture while operating it) but this could be rectified if I rebuilt it. I've learnt a lot and it became more ambitious as it went along and as my confidence grew. The one thing that I think lets it down is the head, I was so engrossed in the mechanism for the body I really didn't consider this until too late so it was a bit bodged.